Understanding LSTM in Tensorflow(MNIST dataset)
Long Short Term Memory(LSTM) are the most common types of Recurrent Neural Networks used these days.They are mostly used with sequential data.An in depth look at LSTMs can be found in this incredible blog post.
Our Aim
As the title suggests,the main aim of this blogpost is to make the reader comfortable with the implementation details of basic LSTM network in tensorflow.
For fulfilling this aim we will take MNIST as our dataset.
The MNIST dataset
The MNIST dataset consists of images of handwritten digits and their corresponding labels.We can download and read the data in tensorflow with the help of following in built functionality-
from tensorflow.examples.tutorials.mnist import input_data
mnist = input_data.read_data_sets("/tmp/data/", one_hot=True)
The data is split into three parts-
- Training data(
mnist.train)-55000 images of training data - Test data(
mnist.test)-10000 images of test data - Validation data(
mnist.validation)-5000 images of validation data.
Shape of the data
Let us discuss the shape with respect to training data of MNIST dataset.Shapes of all three splits are identical.
The training set consists of 55000 images of 28 pixels X 28 pixels each.These 784(28X28) pixel values are flattened in form of a single vector of dimensionality 784.The collection of all such 55000 pixel vectors(one for each image) is stored in form of a numpy array of shape (55000,784) and is referred to as mnist.train.images.
Each of these 55000 training images are associated with a label representing the class to which that image belongs.There are 10 such classes(0,1,2…9).Class labels are represented in one hot encoded form.Thus the labels are stored in form of numpy array of shape (55000,10) and is referred to as mnist.train.labels.
Why MNIST?
LSTMs are generally used for complex sequence related problems like language modelling which involves NLP concepts such as word embeddings, encoders etc.These topics themselves need a lot of understanding.It would be nice to eliminate these topics to concentrate on implementation details of LSTMs in tensorflow such as input formatting,LSTM cells and network designing.
MNIST gives us such an opportunity.The input data here is just a set of pixel values.We can easily format these values and concentrate on implementation details.
Implementation
Before getting our hands dirty with code,let us first draw an outline of our implementation.This will make the coding part more intuitive.
A vanilla RNN
A Recurrent Neural Network,when unrolled through time,can be visualised as-
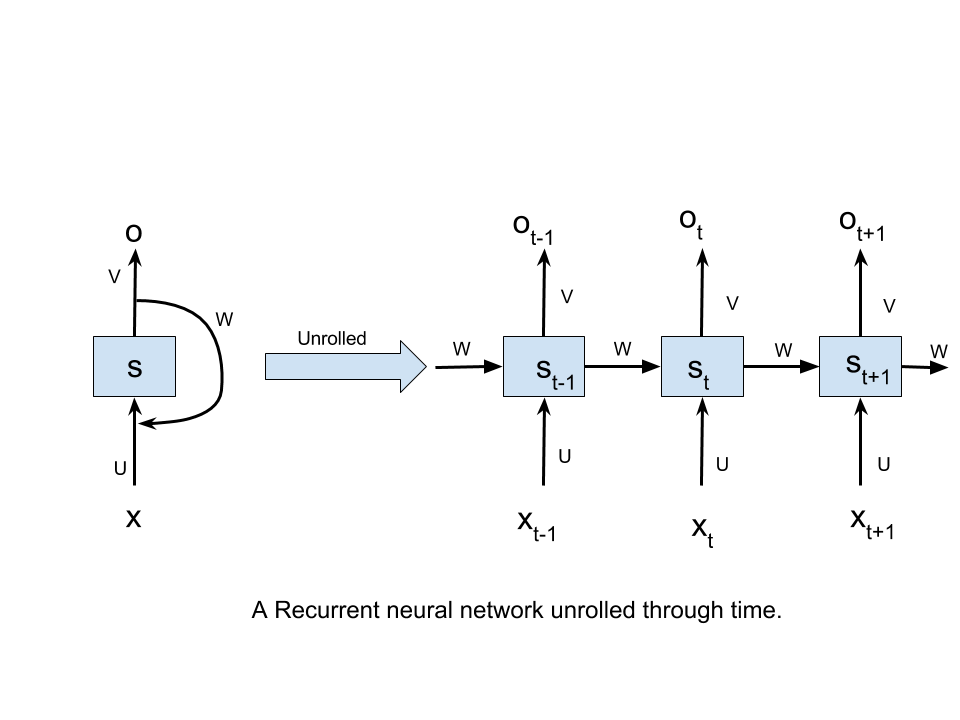
Here,
- xt refers to the input at time step t.
- st refers to the hidden state at time step t.It can be visualised as “memory” of our network.
- ot refers to the output at time step t.
- U,V and W are parameters that are shared across all the time steps.The significance of this parameter sharing is that our model performs same task at each time step with different input.
What we have achieved by unrolling the RNN,is that at each time step,the network can be visualised as feed forward network taking into account the output of the previous time step(signified by the connections between the time steps).
Two caveats
Our implementation will hinge upon two main concepts which will make us comfortable with our implementation:
- Interpretation of LSTM cells in tensorflow.
- Formatting inputs before feeding them to tensorflow RNNs.
Interpretation of LSTM cells in tensorflow
A basic LSTM cell is declared in tensorflow as-
tf.contrib.rnn.BasicLSTMCell(num_units)
here num_units refers to the number of units in LSTM cell.
num_units can be interpreted as the analogy of hidden layer from the feed forward neural network.The number of nodes in hidden layer of a feed forward neural network is equivalent to num_units number of LSTM units in a LSTM cell at every time step of the network.Following picture should clear any confusion-
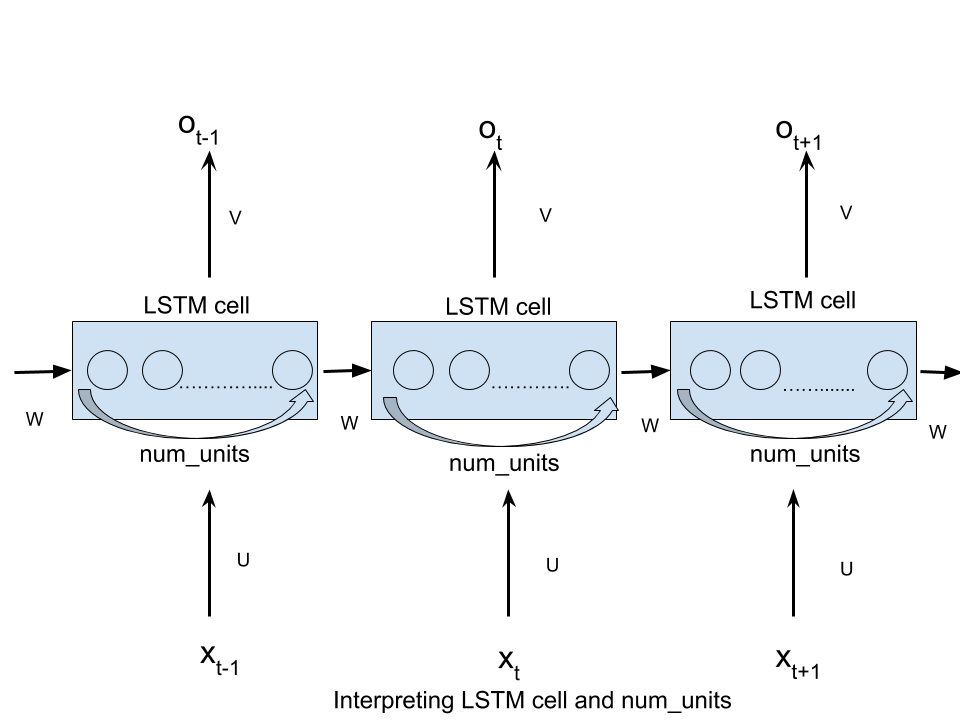
Each of the num_units LSTM unit can be seen as a standard LSTM unit-

The above diagram is taken from this incredible blogpost which describes the concept of LSTM effectively.
Formatting inputs before feeding them to tensorflow RNNs
The simplest form of RNN in tensorflow is static_rnn.It is defined in tensorflow as
tf.static_rnn(cell,inputs)
There are other arguments as well but we’ll limit ourselves to deal with only these two arguments.
The inputs argument accepts list of tensors of shape [batch_size,input_size].The length of this list is the number of time steps through which network is unrolled i.e. each element of this list corresponds to the input at respective time step of our unrolled network.
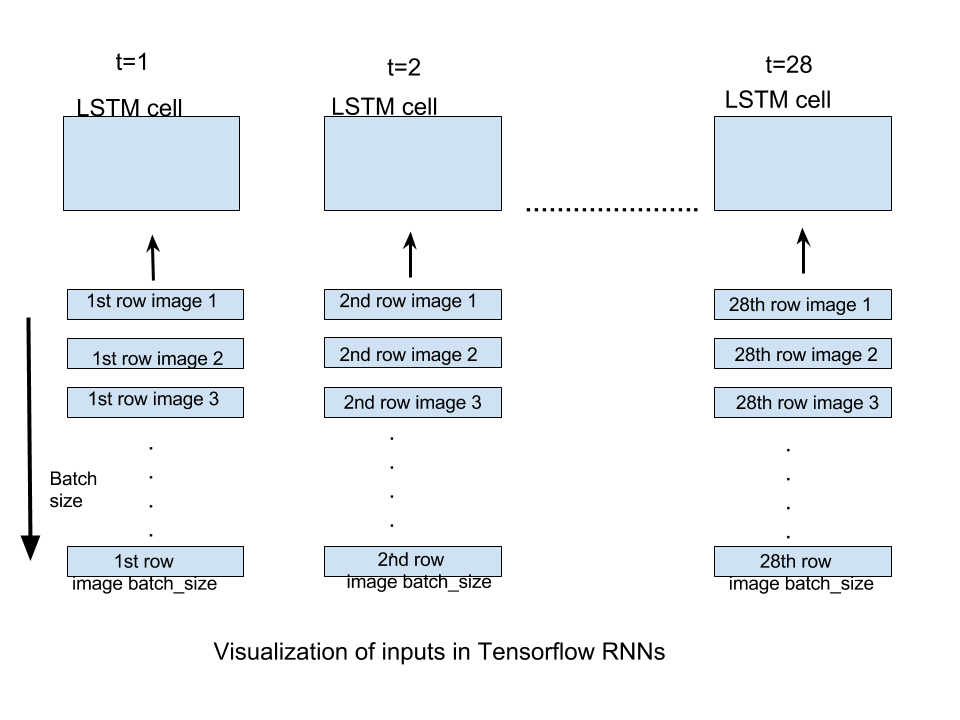
For our case of MNIST images,we have images of size 28X28.They can be inferred as images having 28 rows of 28 pixels each.We will unroll our network through 28 time steps so that at every time step we can input one row of 28 pixels(input_size) and thus a full image through 28 time steps.If we supply batch_size number of images,every time step will be supplied with respective row of batch_size images.Following figure should clear any doubts-
The output generated by static_rnn is a list of tensors of shape [batch_size,num_units].The length of the list is number of time steps through which network is unrolled i.e. one output tensor for each time step.In this implementation we will only be concerned with output of the final time step as the prediction will be generated when all the rows of an image are supplied to RNN i.e. at the last time step.
Now that we have done all the heavy-lifting,we are ready to write the code.The coding part is very straight forward once above concepts are clear.
Code
To start with,lets import necessary dependencies,dataset and declare some constants.We will use batch_size=128 and num_units=128.
import tensorflow as tf
from tensorflow.contrib import rnn

#import mnist dataset
from tensorflow.examples.tutorials.mnist import input_data
mnist=input_data.read_data_sets("/tmp/data/",one_hot=True)

#define constants
#unrolled through 28 time steps
time_steps=28
#hidden LSTM units
num_units=128
#rows of 28 pixels
n_input=28
#learning rate for adam
learning_rate=0.001
#mnist is meant to be classified in 10 classes(0-9).
n_classes=10
#size of batch
batch_size=128
Lets now declare placeholders and weights and bias variables which will be used to convert the output of shape [batch_size,num_units] to [batch_size,n_classes] so that correct class can be predicted.
#weights and biases of appropriate shape to accomplish above task
out_weights=tf.Variable(tf.random_normal([num_units,n_classes]))
out_bias=tf.Variable(tf.random_normal([n_classes]))

#defining placeholders
#input image placeholder
x=tf.placeholder("float",[None,time_steps,n_input])
#input label placeholder
y=tf.placeholder("float",[None,n_classes])
Now that we are receiving inputs of shape [batch_size,time_steps,n_input],we need to convert it into a list of tensors of shape [batch_size,n_inputs] of length time_steps so that it can be then fed to static_rnn.
#processing the input tensor from [batch_size,n_steps,n_input] to "time_steps" number of [batch_size,n_input] tensors
input=tf.unstack(x ,time_steps,1)
Now we are ready to define our network.We will use one layer of BasicLSTMCell and make our static_rnn network out of it.
#defining the network
lstm_layer=rnn.BasicLSTMCell(num_units,forget_bias=1)
outputs,_=rnn.static_rnn(lstm_layer,input,dtype="float32")
As we are considered only with input of last time step,we will generate our prediction out of it.
#converting last output of dimension [batch_size,num_units] to [batch_size,n_classes] by out_weight multiplication
prediction=tf.matmul(outputs[-1],out_weights)+out_bias
Defining loss,optimizer and accuracy.
#loss_function
loss=tf.reduce_mean(tf.nn.softmax_cross_entropy_with_logits(logits=prediction,labels=y))
#optimization
opt=tf.train.AdamOptimizer(learning_rate=learning_rate).minimize(loss)

#model evaluation
correct_prediction=tf.equal(tf.argmax(prediction,1),tf.argmax(y,1))
accuracy=tf.reduce_mean(tf.cast(correct_prediction,tf.float32))
Now that we have defined out graph,we can run it.
#initialize variables
init=tf.global_variables_initializer()
with tf.Session() as sess:
    sess.run(init)
    iter=1
    while iter<800:
        batch_x,batch_y=mnist.train.next_batch(batch_size=batch_size)

        batch_x=batch_x.reshape((batch_size,time_steps,n_input))

        sess.run(opt, feed_dict={x: batch_x, y: batch_y})

        if iter %10==0:
            acc=sess.run(accuracy,feed_dict={x:batch_x,y:batch_y})
            los=sess.run(loss,feed_dict={x:batch_x,y:batch_y})
            print("For iter ",iter)
            print("Accuracy ",acc)
            print("Loss ",los)
            print("__________________")

        iter=iter+1
One crucial thing to note here is that our images were essentially flattened into a single vector of dimensionality 784 to begin with.The function next_batch(batch_size) necessarily returns batch_size batches of these 784 dimensional vectors.They are thus reshaped to [batch_size,time_steps,n_input] so that it can be accepted by our placeholder.
We can also calculate test accuracy of our model-
#calculating test accuracy
test_data = mnist.test.images[:128].reshape((-1, time_steps, n_input))
test_label = mnist.test.labels[:128]
print("Testing Accuracy:", sess.run(accuracy, feed_dict={x: test_data, y: test_label}))
On running,the model runs with a test accuracy of 99.21%.
This blogpost was aimed at making the reader comfortable with the implementational details of RNNs in tensorflow.We’ll built some more complex models to use RNNs effectively in tensorflow.Stay tuned!
Posted on 10 September,2017